360 Pumpkin Products
Sorry our site is under construction........
EMAIL 360pumpkinProducts
 |
|---|
INSTRUCTIONS:
360 Pumpkin
Products
Ultimate
Pumpkin Carving
Kit
! WARNING: This is not a toy. Contains SHARP items! Adult supervision is required. User assumes all risks of possible injury.
Thanks for your purchase! If you need help or for some reason are not 100% satisfied, please give us the opportunity to make it right. Our tools have a lifetime guarantee as well! Email us at: Help@360pumpkinproducts.com
Kit Contents:
(1) 360 Ergonomic Scooper and Scraper Tool.
(1) Detail Scraper and Clean-up tool.
(2) Pinhole Pattern Marking/Hole Poker Tool.
(2) 360 Carving Saws. One equipped with fast-cutting stainless-steel general use saw blade (larger teeth) and one equipped with fine-tooth stainless-steel detail saw blade.
(1) Plastic blade storage box with 4 extra blades.
(2) Clear plastic blade guards.
Carving Instructions:
Step 1: Cut an opening hole in the top or the bottom of the pumpkin large enough for your hand and 360 Ergonomic Scooper/Scraper to enter the inside of the pumpkin. If you choose to cut the opening in the top, make the cuts on a slight inward angle so you will be able to use the cut-out piece as a “lid”. The cut angle will help support the lid by creating a ledge for it to rest on.
Step 2: Remove the seeds and string “goop” from inside the pumpkin.
This is best done with the 360 Ergonomic Scooper/Scraper.
A good, easy method is to scrape the inside of the pumpkin from top to bottom using the side of the 360 Ergonomic Scooper/Scraper in a circular direction. Then, simply invert the pumpkin and dump out the “goop” right into the trash.
The Pumpkin can be sitting flat or you can turn it on its side and scrape in a circular motion. It is recommended that the area that you will be carving should be approximately 1” thick. The wall can be thinned or shaved down with the small Detail Scraper and Clean-up tool.
Step 3: Prepare your design layout:
This can be done free-hand by drawing out your design or using a pattern. If you choose to draw your design, use a marker or pencil on the dry pumpkin surface. Dry erase markers work very well and let you erase your mistakes with a damp cloth.
If you prefer to use a pattern, there are many free designs found online by simply searching “free pumpkin carving patterns”. Our website also has links to many other pattern sources.
Another method for patterns is to print out a picture. If you are using text, you can use a word processing program to design the text and font size and then print it out.
Attach the pattern to the pumpkin with tape, thumbtacks or small nails. You may need to cut small slits in the paper to help it conform to the round pumpkin. Next, use one of the (2) Pinhole Pattern Punch/Poker tools and punch holes through the outline of your pattern every 1/4”-1/8”. Remove the pattern but keep it to use as a visual reference.
As an option, you may wish to connect the small punched holes using a pen or pencil. If you are having trouble seeing the holes you can also rub household flour over the pumpkin. This will fill the holes and make them appear white and easier to see.
Step 4: Your pumpkin is now ready to carve.
Make sure the pumpkin is on a stable surface. You will use the larger faster cutting saw blade with the large teeth for the majority of your work. Keep your other hand away from the saw in case it would slip.
Work slowly and take your time to avoid mistakes or injury!
Lightly press the tip of the blade into the pumpkin to start your first cut.
**Important: The tools are designed to “saw” through the pumpkin. This is a different method than using a knife that “cuts” or basically slides through the pumpkin. The saw blades are designed with a larger leading edge to actually remove the pumpkin material. DO NOT FORCE the saw. Use a light in and out motion with light pressure letting the tool do the work. A sawing motion is straight in and straight out with very little forward pressure. Forcing the saw forward makes it more difficult. The tool is designed to “SAW”. If the tool feels stuck, push or pull it lightly until it starts to move freely. Do not force the blade to turn, again let the sawing action of the teeth guide it along your path.
Carving tool tips:
-Always store saws with the clear plastic blade guards on and inside the case.
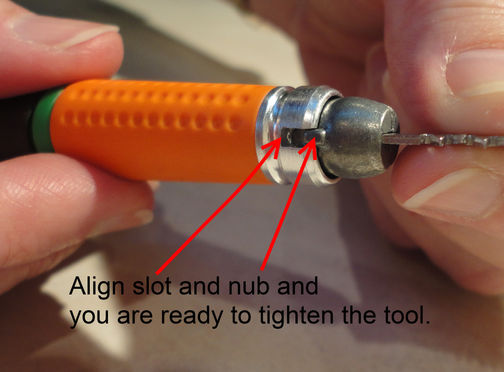
-Do not overtighten the saw blade; hand-tightening should keep the blade in place. Tighten by turning the black handle while firmly holding the orange grip in your other hand. If you have trouble holding the orange grip, you may choose to turn the blade by lightly using an adjustable wrench.
-Take you time and be SAFE!
-Remove / wash residue from tools after use so residue does not dry and harden on the tools.
Tips on extending the life of your carved pumpkin:
-Add 1 capful of bleach to a sink filled with water. Soak the pumpkin for 20 minutes, any time after carving.
-Spray the pumpkin’s cut parts and interior with water and bleach mixture (add a small amount of bleach to the water). Water will help keep your pumpkin from drying out and the bleach will help prevent mold.
-Petroleum jelly can also be applied to cut areas of the pumpkin to help extend the pumpkin’s life.
-Keep your pumpkin in a cool place as long as possible but do not let it freeze.
-When not displayed and when no candle is being used, you can also wrap the pumpkin in plastic wrap to increase its life span.
Need help? Visit us at 360PumpkinProducts.com


